This week I decided that since I was on spring break from school and didn’t have a gig until Friday night I would tear down my larger pedalboard, fix some problems, add some new stuff and rework how I get sounds on stage. I’ve been putting this off for a while just because it’s kind of tedious and you always end up creating new problems to solve in the process. This time was no different.
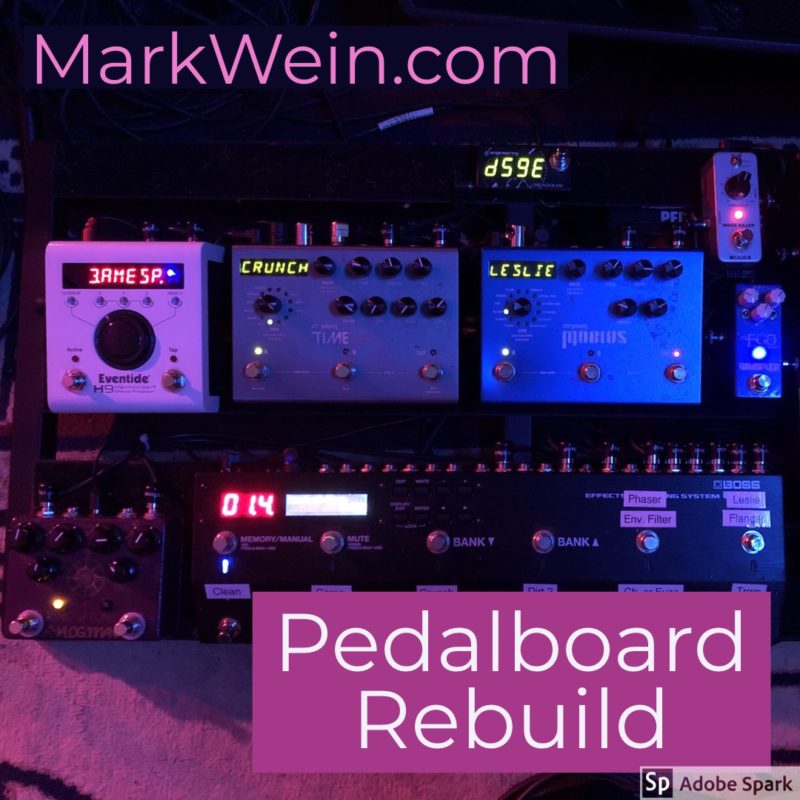
First, a look at how I’ve been using it this year:

Just a note if you’d like to support the blog:
As you read this, you can click on any of the pedals and it takes you to a listing on Amazon.com. I’ll get a little commission from Amazon for any sales generated through the link so you could theoretically click on a pedal, buy toilet paper and I’d still get a few cents. Thanks!
I decided that I wanted to add an Eventide H9 for several reasons, try some ideas that I had seen in some other rig rundown, move my power supply to where it would be easier to plug in on the stages I’m currently on and try some other pedal stuff. Plus, I needed to clean up the cabling and power.
First, we had to clear the playing field:

I’m still using a Pedaltrain Classic Pro board, which I’m kind of unhappy with just because the slat design forces you to make some layout decisions that limit your use of the top space. I carry it around in a Mono Tour pedalboard soft case, which I am incredibly happy with. Next year I’ll probably switch to a flat board of some sort. I will also want to change to a different power supply that has more capacity. The Voodoo Lab 4×4 power supply that I am currently using is great, but making a board this size work with it is a little bit of a challenge. I’ll go into that later.
Once I moved the power supply to a more central location, mocked up the pedal placement and ran the power and audio I had to do a little troubleshooting. A concern for a board like this that has several larger digital effects is that they have different voltage and power draw requirements, and you need to ensure that you have each pedal getting the proper power and is properly isolated from other devices that might cause extra noise. My power supply has 10 outputs, but four of the higher amperage/voltage outs are not completely isolated from each other. This means that I had to research the power draw of each box and map out what went where, and which of the simpler pedals could use a “daisy chain” cable to share an output. This is the stuff that makes me put off changes for months.
While running down my problems I found it easier to clamp the board in an upright position so that I could work on both sides at the same time without too much struggle. The biggest problem I had is that the clock I have on the board apparently does not play well with others and needs its own isolated power output on the power supply. When I had it daisy chained with a few other devices, it created this horrible high pitched hum throughout the part of the board that shared power with it.

Once all of the “construction” issues were taken care of I was able to spend some time programming the sounds that I would be using on my gig. After watching demos of new pedal boards by guys like Pete Thorn and Josh Smith I began to realize that I was working too hard. With a little pre-planning, I was able to work out a new system that made life much easier on stage last night for my first show with the new setup.
Let’s take a look at the final product:
The “control center” of this thing is a Boss ES-8 loop switcher. The ES-8 has the ability to switch up to eight independent loops full of pedals off and on as programmed. I won’t get too into the workings of it, but ultimately I am able to turn off and on complex combinations of pedals with a single button and control the bigger MIDI-equipped boxes at the same time. If you are new to this sort of thing, Brett Kingman gives a pretty good demo of its functionality in this video:

Let’s take a look at each item, starting with the pedals that are in the ES-8 loops:
- Wampler Mini Ego Compressor – I’ve had a bunch of compressors over the years and this one seems to work best for my purposes. Unlike the bigger version of this pedal, the tone and attack controls are toggle switches, which just makes life easier for me. The “blend” control is probably the most important feature of this compressor for me since I I like to have the compressed signal sit underneath the dry sound. It just feels more natural to me that way. I mostly use the compressor with single coil guitars or my PRS to fatten up my cleaner sounds.
- Analogman King of Tone – This usually lives on my smaller board but for the time being it is my lower gain overdrive. It sounds great with my Deluxe Reverbs but the higher gain sounds on the right side of the pedal don’t work as well for me with the Suhr Badger 30. I’m thinking about getting a J Rockett Blue Note for that spot in the near future.
- Voodoo Lab Sparkle Drive MOD – the husband of a college friend of mine worked for Voodoo Lab for years and they hooked me up with some pedals for a really good price when we were doing pedal giveaways on the forum. I tried this and decided to get one for myself. The first setting is an 808 Tube Screamer circuit but there are three “MOD” options available and the first option is a great crunchy rhythm sound. It’s been a mainstay for me ever since and I realized this week that the reason why I can never find a good replacement for it is that the pedal into my Suhr Badger 30 amp when it is running clean sounds A LOT like when I have the gain on the amp cranked to about 7. This provides about 90% of my crunchy guitar sounds throughout a typical cover gig.
- Friedman Amplification Dirty Shirley and the Mooer Noise Killer – This is my heaviest dirt sound, which comes out during the last set of the night. The Dirty Shirley is the first heavy “Marshall in a box” kind of pedal that sounds like an amp channel in my rig. Unfortunately, it is also super noisy so I stole a trick from Pete Thorn and put a noise gate (which I NEVER use) in the same loop and it worked just fine.
- Wampler Velvet Fuzz – I really only use this for a super fat and saturated lead sound.
- Strymon Mobius and Timeline – I have these two in the same loop. The Mobius provides modulation like chorus, flange, phaser, tremolo and the like and the Timeline is a programmable delay. Because these two are MIDI pedals, I can turn them off and on as needed in the ES-8 programming for each patch. More on how I use these later.
- Nothing! I left this open for something in the future. Probably an Electro Harmonix Key9 or B9,
- Eventide H9 – this is my “everything/utility” pedal but I bought it mainly for things that the Mobius does not due, like an analog synth sound or reverb. I will especially get into how I use this one in the next blog.
- Sonic Research Turbo Tuner – My favorite tuner on the market. It’s also the “input” for the whole board, before the ES-8
- Strymon Mini Switch – I use this to tap tempos into the Timeline delay.
- TC Electronic Spark Mini Boost – this is after the ES-8 and runs to the output on the side of the board for a solo boost or a way to hit the front of the amp a little harder on my clean sounds. Super good.
- DS Engineering Chronograph – it is literally a clock. It runs off the pedalboard power supply and helps me keep track of where we are in each set. This way you can’t see me looking at my watch or phone for the time but I can keep track of the schedule for the night in terms of breaks and set lengths.
I plug into the board at the Turbo Tuner and run out and to the amp through one of these 1/4″ outs on the little patch panel that I bought online a few years ago. I believe the jacks are Neutrik and are high quality but the locking tab is kind of finicky. At some point, I might change this but it is not that important. I was thinking of running both outs of the ES-8 through the two jacks but then you wouldn’t get the boost in both sides since it is after the switcher.

In my next blog, I’m going to talk about how I actually use this stuff and probably have a video of what it all sounds like.
